  1
  2
  3
  4
  5
  6
  7
  8
  9
 10
 11
 12
 13
 14
 15
 16
 17
 18
 19
 20
 21
 22
 23
 24
 25
 26
 27
 28
 29
 30
 31
 32
 33
 34
 35
 36
 37
 38
 39
 40
 41
 42
 43
 44
 45
 46
 47
 48
 49
 50
 51
 52
 53
 54
 55
 56
 57
 58
 59
 60
 61
 62
 63
 64
 65
 66
 67
 68
 69
 70
 71
 72
 73
 74
 75
 76
 77
 78
 79
 80
 81
 82
 83
 84
 85
 86
 87
 88
 89
 90
 91
 92
 93
 94
 95
 96
 97
 98
 99
100
101
102
103
104
105
106
107
108
109
110
| <!--
Informationen zur Konfiguration Ihrer ASP.NET-Anwendung finden Sie unter
https://go.microsoft.com/fwlink/?LinkId=169433
-->
<configuration>
<system.web>
<httpHandlers>
<add path="*" type="ServiceStack.HttpHandlerFactory, ServiceStack" verb="*"/>
</httpHandlers>
<compilation debug="true"/>
</system.web>
<!-- Required for IIS7 -->
<system.webServer>
<modules runAllManagedModulesForAllRequests="true"/>
<validation validateIntegratedModeConfiguration="false"/>
<handlers>
<add path="*" name="ServiceStack.Factory" type="ServiceStack.HttpHandlerFactory, ServiceStack" verb="*" preCondition="integratedMode" resourceType="Unspecified" allowPathInfo="true"/>
</handlers>
</system.webServer>
</configuration>```
The next step is to add a global.asax file. Do so by right-clicking your project - add new item - global.asax. In this file, the service going to be instantiated. However, you'll first need a service which can be instantiated. Let's do so by adding our service class: _ExpensesService.cs_. This service is created as described in the previous section:
```csharppublic class ExpensesService : Service
{
public object Post(Expense request)
{
return new ExpenseResponse
{
Amount = request.Amount,
Total = 500,
Status = "OK"
};
}
}
public class Expense
{
public double Amount { get; set; }
}
public class ExpenseResponse
{
public double Amount { get; set; }
public double Total { get; set; }
public String Status { get; set; }
}```
This service basically takes an amount as input for its request, and returns a new response object with a _Total_ of 500 and the _status_ _"OK"_. Of course, there is no logic in here currently, this will be added later. For now, we'll just want do get the service running.
Another thing which we need to set up is the previously created global.asax file. Simply add the following code inside the AppHostBase-class (the overriden class should already be there, you don't need to set this up manually).
```csharppublic class ExpenseTrackerAppHost : AppHostBase
{
public ExpenseTrackerAppHost() : base("Expense Tracker", typeof(ExpensesService).Assembly) { }
public override void Configure(Funq.Container container)
{
// Configure Application
}
}
protected void Application_Start(object sender, EventArgs e)
{
new ExpenseTrackerAppHost().Init();
}```
## The Meta Page
By now, the service should be able to run. When starting the project, you should be able to see a window like the following:
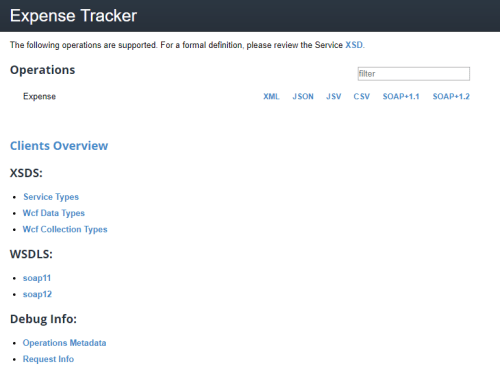
This overview provides information on all available services in our application. By clicking on the _JSON_-entry of the Expense-Operation, information about the service is displayed.
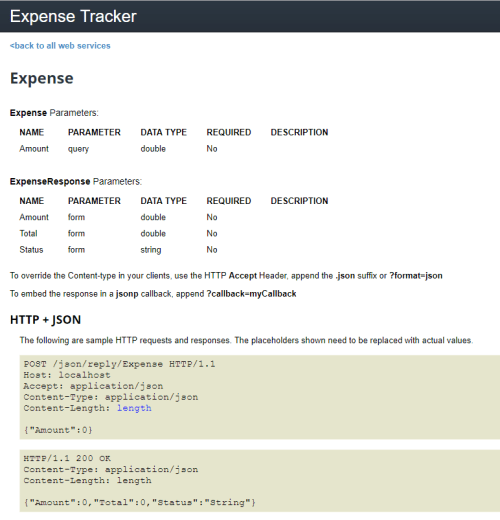
As you can see, this gives plenty of information on the service, including its route (/json/reply/Expense), its HTTP-verb (POST) and its parameters. Also, it shows us how the response-object will look like.
## Testing with Postman
To try this out, I use a tool called [Postman](https://www.getpostman.com/), which you can download as extension for chrome, but I recommend the standalone version, since the plugin is outdated. Postman allows us to test our routes and objects with the several HTTP-verbs and optional parameters.
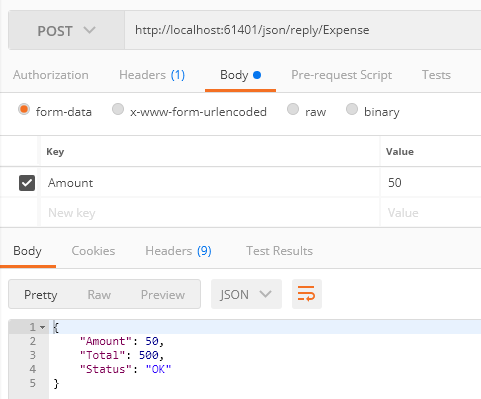
As you can see in the image, I set the HTTP-verb to POST and added the previously noted route. I also added an "Amount"-parameter, which ServiceStack then maps to the POCOs pendant. The response we get displays pretty much what we've expected.
## Adjusting the Routes
One thing that bothers me here, is the fixed route which looks pretty ugly. We can adjust this by adding a [Route]-Attribute to our service.
```csharp
[Route("/Expense")]
public class Expense
{
public double Amount { get; set; }
}```
You can also specify multiple routes for one object, by adding curly braces you can add variables. If you want a variable to be optional, simply add an asterisk after the variable name. In the following example, both routes could be combined that way.
```csharp
[Route("/Expense")]
[Route("/Expense/{Amount}")]
public class Expense
{
public double Amount { get; set; }
}```
Finally, note that ServiceStack doesn't recognize the format any longer with these custom routes. To clarify, what format you'll want to receive, simply add its ending to the route, like this: /Expense.json.
So that's it for todays post, the next one adds the C#-Client to easily communicate between C#-applications!
|