Today, I’ll talk about how you can set up PGP for Thunderbird. PGP (Pretty Good Privacy) allows you to encrypt and digitally sign your emails. I wanted to publish this post for quite some time now and thanks to some help from the 34C3, I finally managed to do it.
Pretty Good Privacy (PGP)
Before we can start installing all the requirements and setting up PGP, I’d like to give you a short introduction to PGP. Basically, PGP is a tool to encrypt and digitally sign emails by applying public key cryptography. This means that you link your email account to a key pair, which can be used to encrypt and decrypt mails. Each of these key pairs consists of a public and a private key. Using those keys, you can encrypt and digitally sign your emails. Any person that knows your public key will now be able to use it to encrypt emails. On the other hand, you can use your private key to prove that you are the author of the email. Your private key will be used to decrypt mails encrypted with your public key and vice versa.
To wrap this up: you have your email account set up to send and receive encrypted emails. Use your public key to allow other people to send encrypted emails, and use your private key to encrypt these or digitally sign emails. Any person that knows your public key can decrypt mails you signed with your private key. On the other hand, only you can read emails that were encrypted with your public key.
One thing I have to mention altough is that PGP will not encrypt your whole message. The encryption only affects the mails content and attachments, but senders and recipients addresses, as well as the subject of the mail are still send in plaintext.
Prerequisites and Installation
To be able to send and receive encrypted emails, you need several components. First of all, you need an email client. I recommend using Thunderbird since it’s open source and works great with the PGP-addon I will cover in the next step.
The second thing you will need is GPG (Gnu Privacy Guard). GPG is where the actual encryption happens. It is the basis for GPG.
Last but not least, you need something to tie GPG and email client together. For this task, I use the Enigmail Thunderbird Plugin.
I recommend starting off by installing Thunderbird and GPG. Depending on the platform you are using, you can either install GPG by downloading it from gnupg.org or by using your linux distros package manager.
After you have Thunderbird and GPG installed, you’ll want connect Thunderbird to your email account. Note that a PGP key pair is linked to one email address, so if you want to use multiple, you’ll have to one key pair for each address.
On this occasion, I’d also like to mention that you can of course still synchronize encrypted emails with your smartphones email client, but to encrypt them, you’ll need the matching private key. While you can use the same keys on both your phone and your pc, I recommend to really take your time thinking about doing this. When you lose your phone, attackers could gain access to your saved emails. Also, the security of a mobile phone is a completely different matter than the security of a PC. For this reason, I chose not to do this and to use encryption only on my computer.
So much for that. The last thing you’ll need to install is the Enigmail addon for Thunderbird. You can do this by using the plugin manager built into Thunderbird. On linux distros, you can alternatively utilize your package manager (this works at least for Arch and Ubuntu).
Setting up Enigmail
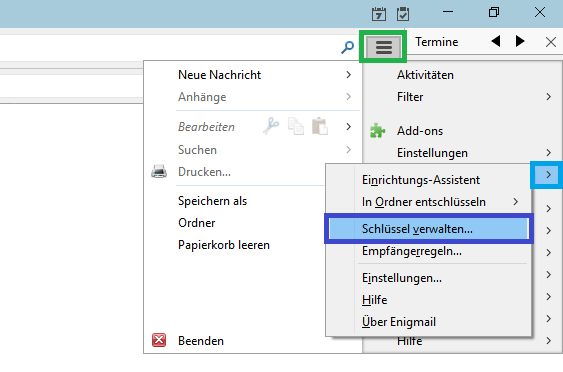
The next step is to set up a key pair and link it to an email account. You can access the Enigmail configuration by clicking on the hamburger menu in Thunderbird. Select the Enigmail entry by hovering over the arrow symbol, which displays a context menu. Select manage keys to proceed.
The now displayed list contains all your locally saved keys. At this point, this list should be empty. To create a new key pair, select the Create entry from the menu bar and then click the New Keypair button. In the following dialog, start of by selecting the email address that the key pair should be assigned to. I recommend to set a password at this point, you can also specify how long you want the key pair to be valid.
The key generating process will take a short amount of time. After the keys have been generated, you can specify wether you want to create a revocation certificate. These allow you to manually revoke the validity of your key pair. I recommend doing this, since a person that has gained access to your keys will not be able to use them anymore. You should store the resulting file in a save location and assign it a save password, since a person that has access to it could disable your PGP keys.
Mail & Key Exchange
When creating an email, you’ll notice the new enigmail-menu:
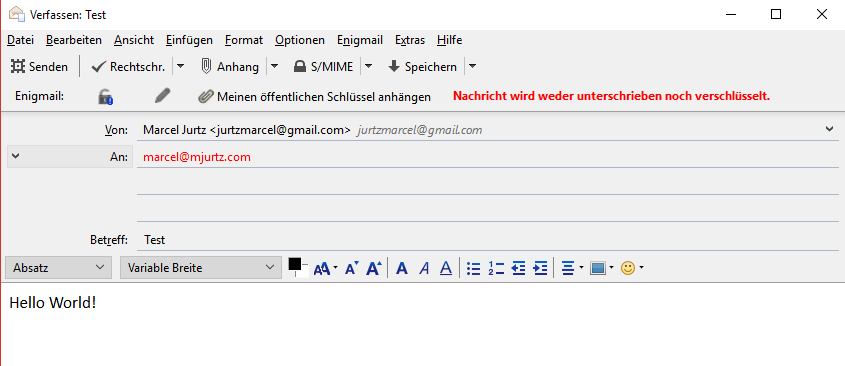
As it is stated in bold red letters, the mail is currently not being encrypted. To change this, you can click the lock icon. To digitally sign your mail, click the pen icon right next to it. Of course, you can do both simultaneously. You can also send your public key as an attachment, but note that this will only be useful if you don’t sign your mail as the recipient will already need the key to encrypt the mail otherwise.
You need the recipients public key in order to encrypt emails. There are several ways to exchange keys. One way are so called key servers. That basically is a service offered by enigmail, where public keys can be uploaded. Thunderbird then can utilize these servers to search for keys by email address.
While this approach works quite well, there is one problem: You can’t be sure that the keys aren’t changed from a third party.
The second option is to share keys via your personal website or any other channel. The best option regarding possible tampering would be to meet in person and exchange keys, but that’s not always a viable option. One way I recommend using is to provide public keys on as many ways as possible, simply to allow as many people as possible to find it.
An additional tooling to prevent tampering, I recommend using fingerprints. This means that you can publish a hash of your key on a trusted way (business card etc.) which people can use to verify your public key.
If you choose to not or not only use the key servers, you can export and import keys. To manually exchange keys, go to the key menu we used earlier. To export a key, right click the entry and select Export to file. If you want to import keys, simply use the File entry from the menu and import the file. The key will automatically be added to Thunderbirds key list and can from now on be used for the matching email address.
To test your keys, I recommend simply sending an encrypted email to yourself and to verify it in your webmail client. The encrypted email will look like this:
—–BEGIN PGP MESSAGE—–
Version: GnuPG v2hQIMAzeTl89mQ+b4AQ//ae5T5gcqMLo/nBIQHNw+O/HSeyOI5Lg0nexgPpB44c8Z
fdUSpRnfK02P6KPrFXSm5h+BZzCX020aVstwzhdvHpK3wiEvrzDUcURrWBJ9RRAC
AbM+r3+V7T017XOj8JIhsT+/NTKzZAqhZzRCC6DFL/cPYkS+n4+w1Hp817W5KIlJ
HdrMFUx64DSWDZ1ylNzrqMi102+tTBqqTqJIm36j8qRXzvQfjYPlxrGPq3DxEW9S
egsw0iKvkTfw+/qdvVFHPYUn/suUJBe89ZD8nFNX9FVv0vCFj2t/IbA9jCKocHOX
0JnxgYrrz31M7NuFJHlXzzYahn2Ebe9ruwtG5K159/ITZUpYLK7/yeuBXNgu1OED
8hvBoq9hwqGt/f8C/lovumNDs8ALvyIzRyhVJ2Flxi2WqFo/7IJwCPfD6HsUpR2d
tyZTQ0fFXyFkIOEb4+QjEW8jgtDS0s8M2Ew+30BvYQ3hiDsNuQ5H23VN6pX3fHY8
F1k7B5fn0EHYPe2R1WbEqEG8qzN+elnM/yJ4OQVirytpFhYBgoDSTMFEQKneBHjj
jHXVVk913sSZnlhQFteEznIwP4OjNoAizRNzfOCXMCyblcyA9XtstZ00VhbcsdUN
+kNT53Ut5HdA38OqOzuGB410P1XXjGh0wrZ19s4Bdb38Ji+Gm7WdNyUbTY3mOCLS
wLUBXyQHI9gaWSA4uKuBJ95BbKrKvl3EdLjWfvfZT192tuK1NLb9CVkEjCIDH4gq
abkb13N3dFyEaKVkacjCQLGNYJ8OxxNP3l6WAodqYZ2+bS6AaHtLAkgJ7tfAKp7+
k8y4XZRSXu15DaE9DQST1ofIaAmJCzcJtDrloQpmBnQJVAPVI4ah+VTrzB4Bfrqw
/5bUcJD09jBsGayOucGNmfTgq0dnuODoEWpPK7faOppjbFC7lHEWgfE/sE9lFwWX
VFQV7Y5DWoJWSSKf19Lk7L7f14GniO/ONBh5iMlPZ2Nmcwkw2zIs7NWyk8SZgDxr
OCQ7jY28HEBVBWFF6oL+Tq8bqENBmf0W67Xnjc7zgjSKtOZl3jCePrQvp1PUvTpQ
DV6Q91RF8Gq8TGZmhZkqv8CNdQcPWPxjefqGr+uuDcLh8kYcBjISqTYjRvZWw8ck
Lid1jZe/8nmyCCXNB/ntXsYL4eo2SM0yb2lV8amV0cz9ru4khdWf
=Q17/
—–END PGP MESSAGE—–
In Thunderbird however, it will automatically be decrypted. Note that you might need to enter the passwort you’ve set for the key pair before the mail can be decrypted.
How to continue
While this introduction hopefully gave you an idea on how to set things up and get started, I recommend not to stop at this point. There are two websites that I were introduced to and I’d like to share them with you. Both this, and this website offer a great overview of different topics regarding digital self-defense. Also, stay tuned for further updates on this website!